Video Tools
- Recording Short Videos
- Cropping Videos
- Frame-Analysing Videos
- How to create a gameplay comparison video
Recording Short Videos
There are 2 options for recording videos (of, say, length <10 mins) that both make recording SMS ILs very low-effort. Both rely on you having already set up OBS to record/stream in general.
-
Twitch Clips/Highlights
You can stream to Twitch. Whenever you PB, create a stream marker by typing e.g./marker bianco 3 39.08. After ending stream, you can open the past broadcast in the Twitch highlighter – make sure that store past broadcasts is enabled in Twitch settings – and the markers appear in the timeline, allowing you to create highlights. Creating clips can be a bit faster, but they’re limited to 1 minute in length. You can create clips on the spot though, if you have your stream up while streaming, or afterwards from stream markers – while in the highlighter, click the cog on the video player, then “copy the video URL at …”, paste it into a new tab and then create the clip from there. You can make an alt account to stream things you don’t intend to be watched; you can save different stream keys to different OBS profiles to make it easy to switch between accounts. This is a good option for auto-hosted videos, but requires a permanently-live internet connection. -
OBS Replay Buffer + YouTube
OBS replay buffer is a feature you can enable via its tab in OBS output settings (also available in Streamlabs OBS). It records your video in a fixed-size space in memory that’s cyclically overwritten, meaning the previous few minutes are available at any given time. Set the replay size to be longer than the IL, and bind a hotkey to save replay. Then, pressing the hotkey will save the last few minutes of recording to a file. Hence, when you PB, you just press the button to save a video. Make sure to check the replay size beforehand, and you must start replay buffer in OBS before using it! These videos can then be put on a throwaway YouTube account; no need to present them or even title them. You may optionally crop the video before uploading (see below), but if not, please timestamp the link. This is a good option for recording ILs offline, but requires more clicks to put them up online.
How to Streamline Uploading to YouTube
To streamline uploading clips to YouTube, edit a few default settings. In YouTube Studio, click on Settings in the sidebar. Then in Channel > Advanced Settings, set your channel as “not made for kids”, and in Upload Defaults, set Visibility to Public or Unlisted. Then, to upload videos, you can put them all in a folder and upload them all at the same time, but have to publish them one-by-one (by clicking Edit, selecting the third tab, then Publish). You receive a link each time you publish, ready to paste in a sheet.
Cropping Videos
Use LosslessCut; download the latest release here (the zip is 450MB after extraction but starts instantly; the standalone exe is 100MB but takes about 7s to start).
What it does: every video you have has been encoded – the computationally-intensive and quality-degrading process of turning a video from a series of frames of pixels, which takes up enormous disk space, into video files of manageable size. The downside of encoding is that most frames are specified as differences from other frames, meaning the video can’t be cropped to those frames without decoding and re-encoding, losing time and video quality. The other, standalone frames, known as keyframes, occur every few seconds in the video. LosslessCut lets you seek between these and then creates a trimmed copy of your video, instantly and with no quality degradation, and also starts up fast. None of these things are true of a full-on video editor like Premiere Pro.
How to use: click on the seeking bar, then press alt + ←/→ to tab between the keyframes. Press i to select start point and o to select end. Then click Export (keep the advanced options default). If you don’t crop on a keyframe then the program snaps to the nearest inclusive one, whence the crop boundaries are slightly off, but the video is otherwise fine.
To crop a video after uploading to YouTube, you can alternatively use YouTube Studio – edit a video, then click Editor in the sidebar, then trim.
Frame-Analysing Videos
You may want to watch videos frame-by-frame, or retime videos. On YouTube, you can do the former by pressing the , and . keys, but it’s impossible on Twitch. In general, you need to download videos (see next section) to analyse them. VirtualDub is currently standardised for use in SMS (though it’s Windows-only) – install the program and extension (which makes it support a wider range of video formats, notably mp4).
Just click anywhere on the seeking bar and tap ←/→ to frame-advance. The HUD below gives you absolute frame-numbers, which you can subtract to find durations counted in frames. Go to Video > Frame Rate (or press ctrl + r) to see, at the top, the frame-rate of the video. Then a duration is the difference of two frame-numbers divided by the frame-rate.
How to create a gameplay comparison video
This tutorial will explain one method of making gameplay comparison videos, using the free video editor Kdenlive.
Install Kdenlive
Visit the download page and choose the version for your operating system. For Windows, the Installable version is recommended.
Set your project resolution
On the top menu bar, go to Project -> Project Settings. Changing the project profile to HD 1080p 30fps is recommended. In a comparison video, two or more clips usually need to be shown at the same time, which will require making them smaller. Increasing the resolution will make the clips clearer.
Import your clips
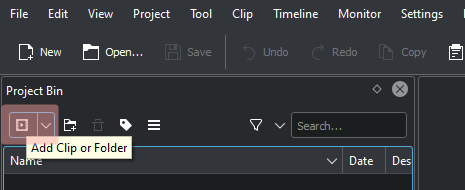 Import the clips you’d like to use by pressing the Add clip or folder button in the top left of the Project Bin area.
Drag your clips onto the timeline at the bottom of the screen.
Warning: If prompted, do not “switch to clip profile.” This will change your project resolution to the resolution of one of your clips. This will likely make the quality low, because your individual clips will be downsized to fit two or more on screen for your comparison.
Position your clips on the screen
 To play two videos at once, drag each video onto a different video track on the timeline. The video tracks are labeled V1 and V2.
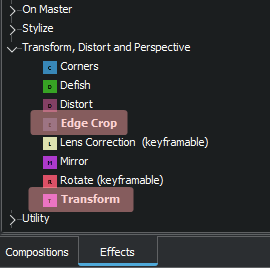
In the Main Effects window, open the Transform, Distort and Perspective submenu. Click and drag Edge Crop and Transform onto each of your clips on the timeline below.
To edit the Edge Crop and Transform effects for a clip, click the clip on the timeline to highlight it in orange. The settings should appear above.
Crop your clips to their desired size using the Top, Left, Bottom, and Right fields in the Edge Crop settings. Edit the pixel count directly by clicking the number and typing in a new number, or scroll while hovering over the bar.
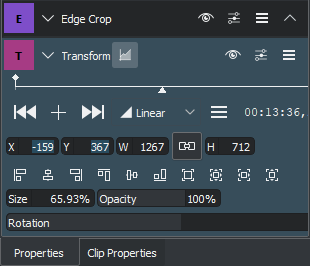 In the Transform settings, make sure both clips are the same size by typing the same value into the Size percentage field for both of them. (For videos with two clips, 66% is recommended.) Then, position it on the screen by changing the X and Y fields. Scrolling can help for finer adjustment.
If you want to save your settings for these effects for future editing sessions, click the Save icon to the top right of the effect settings box. To access them later, press the “Show all custom effects” button (It’s a star with a pencil, above the effects list).
Edit your video
To change the length of a clip, hover over the beginning or ending in the timeline so your cursor turns into an arrow. Then click and drag to change the length. To create text on the video, right click inside the Project Bin (where you imported your clips) and select Add Title Clip. Type in your text, style it the way you’d like, then press Create Title. Drag it onto the timeline alongside your videos in a new video track. (To add a new video track, right click the area to the left of the timeline and select Insert track.) To edit your text or its location on the screen, double click it in the timeline. This should open the same text editor as before.
Warning: Clips may look laggy when playing them back in the editor. That’s because the editor is applying the effects in real-time. It will likely look smooth after it’s rendered (unless your source clips have issues).
Render your video
When you are done editing, press the Render button on the top of the screen (It has a red circle next to it).
Most likely you will want to choose the MP4 format under Generic, and select the Full project option to render the entire timeline. For the Quality option, lower numbers are higher quality but much larger file size. Setting the quality option to 23 is recommended to start out.
Change the Output file on the top to save the final video in a folder you can easily access.
In the More options checkbox area, Parallel processing may make the video render faster. However, if you see glitches in the final video, then try turning it off and re-rendering your video.
Finally, upload the final product to YouTube and share!