Pianta 5
( guide by schmittd11 & Zeldocto )
Pianta 5 is made up of two parts: the Entry and the Secret.
Entry
Pre-Yoshi Skip Movement - Click for Details
- Upon entry, hoverslide across the bridge. If you find the hoverslide inconsistent, you can walk forward while spraying then jump dive when the water reaches the bridge and slide
- Swich to hover nozzle and hold R while sliding. Steer left, then when Mario hovers, release R and press and hold A to full double jump left of the bridge, carrying the speed from the slide. Be careful not to bonk on the wall.
- Hover to the grate, then dive rollout and hoverslide rollout to the mushroom below. Alternatively, second dive hop can be used instead of the hoverslide
- Spin jump and hover to the next mushroom, then spin jump dive to the green mushroom and perform a small rollout to land on the sloped section of the mushroom, allowing Mario to carry his momentum into his next spin jump. Alternatively, a spin jump and hover can be used instead of the spin jump dive and rollout
- Spin jump and hover to the green spotted mushroom and perform yoshi skip
Yoshi Skip Page
Secret
The chucksters always throw Mario directly opposite of the direction they are facing at the moment the chuck begins. This means that if you talk to a chuckster from behind and mash through their text before they turn all the way around, they will throw you in an unintended direction.
- Upon entry, dive rollout then perform two jump dive rollouts to talk to the first Chuckster.
- Talk to the second chuckster, ensuring that they turn fully around before chucking
- If the second chuckster is stopped at his front spot, it is possible for him to throw you to the next platform with a tight enough angle and using A+B mash to get a jump dive input into the chuck for extra distance.
- Talk to the third chuckster. Similar to the second chuckster, it is possible to attain “platform skip” and make it all the way to the final platform with a tight enough angle and a well timed A+B input.
Early Cycle
The final chuckster can stop at one of 6 nodes on the upper platform. These are shown below: 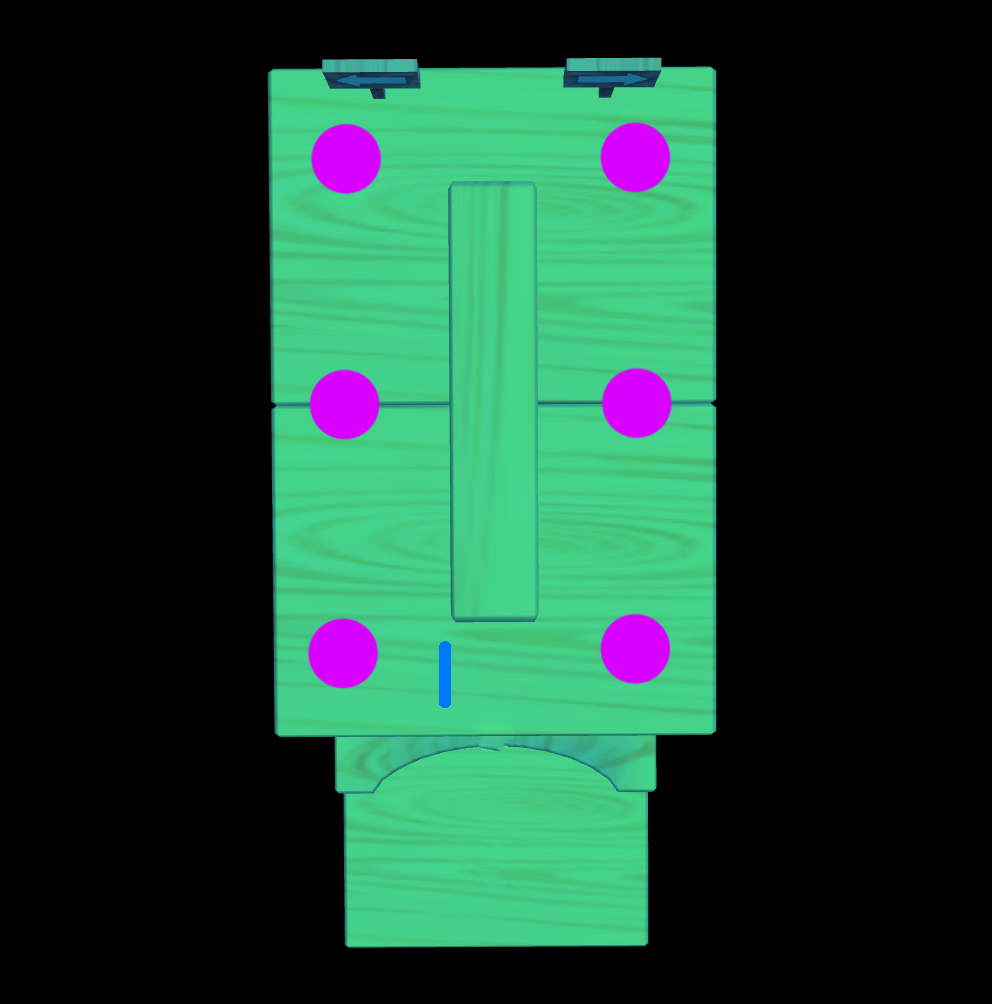
The chuckster starts at the top left position and walks counter-clockwise continuously through the six nodes. When the chuckster begins his walking phase, a timer is set to a random value between 2.5 and 25 seconds. When this timer finishes, the chuckster will continue walking until he reaches the next node and then stop. Once the chuckster stops, he will wait for a random amount of time between 0.833 and 10 seconds. Then he will begin his walking phase again, and the process repeats continuously.
To attain early cycle, you must talk to the final chuckster before he reaches the spot above. With nearly perfect execution, it is theoretically possible to achieve this without the final chuckster stopping at all. An example of this is shown here. This requires talking to the 2nd chuckster immediately, which can be done regardless of which direction the chuckster is facing on NTSC-U and NTSC-J because of their longer textboxes. However, due to PAL’s short textboxes, the chuckster must be facing towards Mario, otherwise talking to the chuckster from behind will cause him to throw Mario an unintended direction.
Chuckster Manipulation
While talking to a chuckster, any other chuckster that is moving stops in place. While stopped, their walking timers continue to tick down. This means that the longer you talk to a chuckster, the more likely future chucksters are to stop at their next nodes. A thorough explanation of chuckster manipulation can be seen here:
The easiest way to attain early cycle is if he stops at node 2 and/or 3. The longer he stops, the more likely it is to attain early cycle. Without chuckster manipulation, the probability of him stopping at least once is 43.56%. However, some chuckster manipulation is inherently incurred by talking to the first three chucksters, which increases the probability of the final chuckster stopping at least once.
Rat Bounce
Demonstrated in the video below, rat bouncing can be an effective technique if early cycle is not achieved. Rat bouncing is simply bouncing on the chuckster right before they reach a node where they can stop. This resets their walking timer which ensures that they don’t stop at the node directly in front of them because it takes less than the minimum 2.5 seconds to reach that node. In addition, they are unlikely to stop at the following node as well, so it is not recommended to rat bounce at two nodes in a row. A common example of what would be recommended if early cycle is missed is to rat bounce just before Node 4, let the chuckster walk through Node 5, then rat bounce again just before Node 6. There is roughly a 17% chance of the chuckster stopping at Node 5 after stopping at Node 4. If he stops at Node 5, let him walk through Node 6.
Y-Turn Adjustments
After being chucked, it is possible to affect Mario’s trajectory in mid air by pressing the Y button and holding left/right on the control stick. However, this does cause Mario to sacrifice some of his forward momentum. Mario’s trajectory is always adjusted opposite of the direction that is being held, relative to the direction Mario is facing.
If Mario is thrown forward and you want to adjust his position to the right, hold up+right and spam the Y button. Y cam will put the camera behind Mario, so while the camera is repositioning to behind Mario, roll the angle that you’re holding from up+right to down+right to lose as little forward momentum as possible. An example of this is the third chuckster throw in the video below (0:17).
However if Mario is thrown backwards (using the Y+A throw) and you want to adjust his position to the left, hold down+right and spam the Y button. An example of this is the final chuckster throw in the video below (0:26).