Bianco 2
( guide by shoutplenty )
Bianco 2 demands special attention when learning because it has the most complex decision-making of any level in the game. The basic idea is to approach the lake as fast as possible, to be able to handle any pattern the spider (pondskater) throws at you and bounce off it, and to then know which cycle to go for for windmill wall-kicks (or riding the platform). Each of these sections is covered on a separate page. The Petey fight will be handled in a separate future section.
Beginner Strategy
Though it’s tempting to crack this level on first visit since it’s the 2nd shine in most full-game categories like Any% and 120 Shines, it’s one of the most atypical and experience-heavy shines, so the biggest gains for a beginner are made by going for simplified strats and focusing on developing simple movement-oriented levels like Bianco 3 instead. As a beginner, go for the following (seen in the example video below):
- any approach to the pond;
- a simple linear strategy for getting the spider-bounce (see Spider section);
- ride the windmill platform.
Approach
Spider
Big Picture
Paragraphs that beginners should consider are marked with ☼.
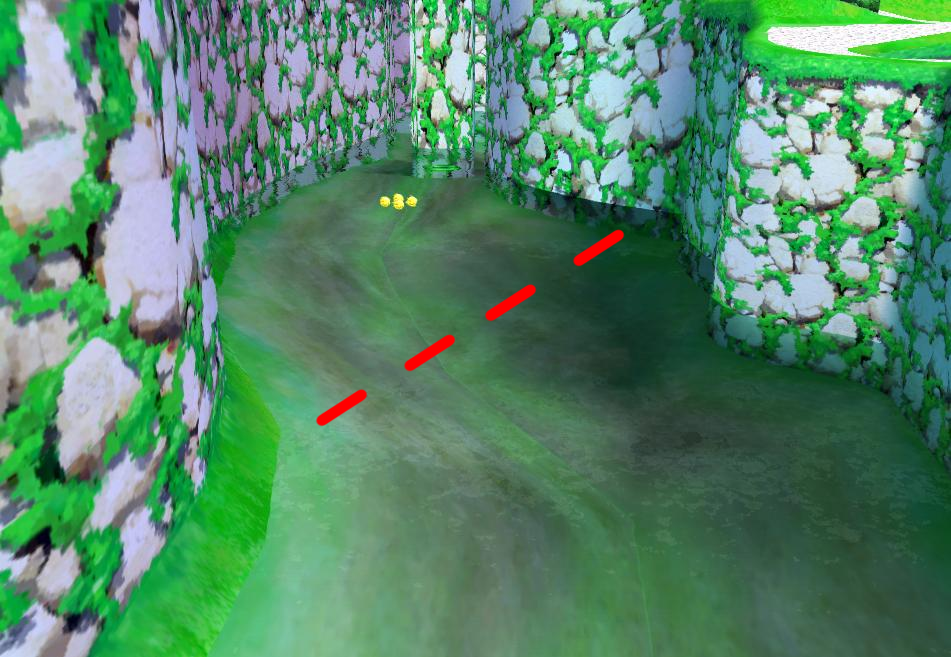
☼ | The most important thing is to make it across, and that’s not possible from every spider position. Imagining a line from the closest part of the pond to the windmill to the furthest, it’s the back 1/3 that’s dangerous, but even when it’s possible to make it from further back, it leads to a huge hover that loses many seconds. We can make it more safely by:
- Diving onto the spider (also faster), since this gives extra speed.
- Spinning in midair if it looks like we’re falling short, though this is slower – it reduces Mario’s gravity on falling only, so gives a little more air-time but isn’t that useful.
☼ | The next most important thing is your angle of approach onto the spider – this has a big effect where you end up after the jump, and so the hover duration to the windmill. This tests your spatial awareness – to orient yourself, bear in mind the imaginary line from the (lake) entry-point to the corner in the back wall.
Mario can travel along the left shore without influencing the spider, which is faster than air and water-based travel, so for fast execution, it helps to enter the water at the point of the shore closest to the spider.
☼ | Conversely, once in the water, the spider homes in on Mario’s position, which means that baiting it closer to the windmill is a slow but reliable strategy, particularly for handling otherwise slow/difficult/impossible positions. A non-beginner should also foresee when the spider is first triggered by Mario landing in water, as part of the plan.
When deciding between water or air (hover) travel, it tends to be that water is faster but air is easier – when the spider is very close to Mario then air is also faster. Many strategies that are done by quickly diving out of hovers can instead be done by skipping the water re-entry and setting up the final angle onto the spider during the previous hover.
You may need to travel far along the shore to get close to the spider. Travelling far means the spider becomes more likely to shoot off in a different (entirely random) direction, because the travel costs enough time. This can negatively impact the idea of approaching the spider on land first, but can be mollified with spam-sprays from high up, which cover a large area.
Beginner Strategy
The ☼ paragraphs above are all we need to come up with a linear beginner strategy. Make sure to start practising the normal reaction-based strategy detailed below asap, however, since it’s key to getting a good (first) windmill cycle and building consistency on Bianco 2.
Beginner Spider Strategy
Spin-jump-dive off the shore after the waterslide to get close to the back wall, then try to immobilise the spider. You can wait for it to home in, then jump out and hover backwards over it, or if it’s in front of you, jump out and spam-spray while in the air. Try to then swim/hover around to get a good angle on it, then jump, hover (possibly backwards) to give yourself the right spacing and adjust angle, release hover and dive onto it.
Inputs
There are a number of non-trivial inputs to practise that are used for different spiders.
Water jump-dive (WJD)
This is the fastest method for swimming in the game. Mario can only jump out of the water when the left stick is neutral. As soon as you jump, hold forward and press B – sliding thumb from A to B in 1 frame is ideal. After landing, you can hit neutral again and repeat, but multiple swims are rarely needed in Bianco 2.
Water spam-spray (WSS)
We can exploit the above mechanic to spam-spray without jumping out of the water – we just need to spam-spray while holding up. These are great for immobilising a spider that’s coming towards you from in front.
Spam-spray dive (SSD)
This is the same as the normal movement option for starting a waterslide from a spam-spray while having the spray nozzle active (e.g. used in Ricco 5 and Gelato 1 to clear bloopers/cataquacks). Jump out of the water, hold digital R, then slide thumb from A to B. Doing the spam-spray sooner into the jump will make this move cover more distance, but harder to input.
Spam-spray hover (SSH)
Similarly to SSD: jump out of the water, hold digital R, then slide thumb from A to X. The hover takes a few more frames to come out, so these inputs must be somewhat fast.
Spider Flowchart
Explained with a sample of 20 spider reactions from EquivocalGenius.
The basic flow of a spider segment is recognising its position, doing a jump move accordingly, then recognising its new position and repeating. To try to keep the flowchart understandable, we’ll explicitly specify decisions and optimal movement options (with video examples), then mention modifications.
Before jumping into the water, do 1 or 2 jump-dive-rollouts along the shore to get closer to the spider without entering the water – 1 vs 2 depending on which brings you closest to it. This also buys us time to react to a spider that’s not visible upon approaching the lake because it’s off to the left.
Try to not enter the water by accident; if the spider is in the middle, baiting it brings it too close, so it’d have to be baited back, which would lose tons of time. You can grind along the wall while jumping/diving to take it safely, and won’t bonk unless your angle is very aggressive.
Next, we pick between three strategies, which will each get a section. From here on out, we’ll split things up into “moves”, each corresponding to a single jump, possible hover, and (re-)entry into the water. We pick the strategy depending on where the spider is.
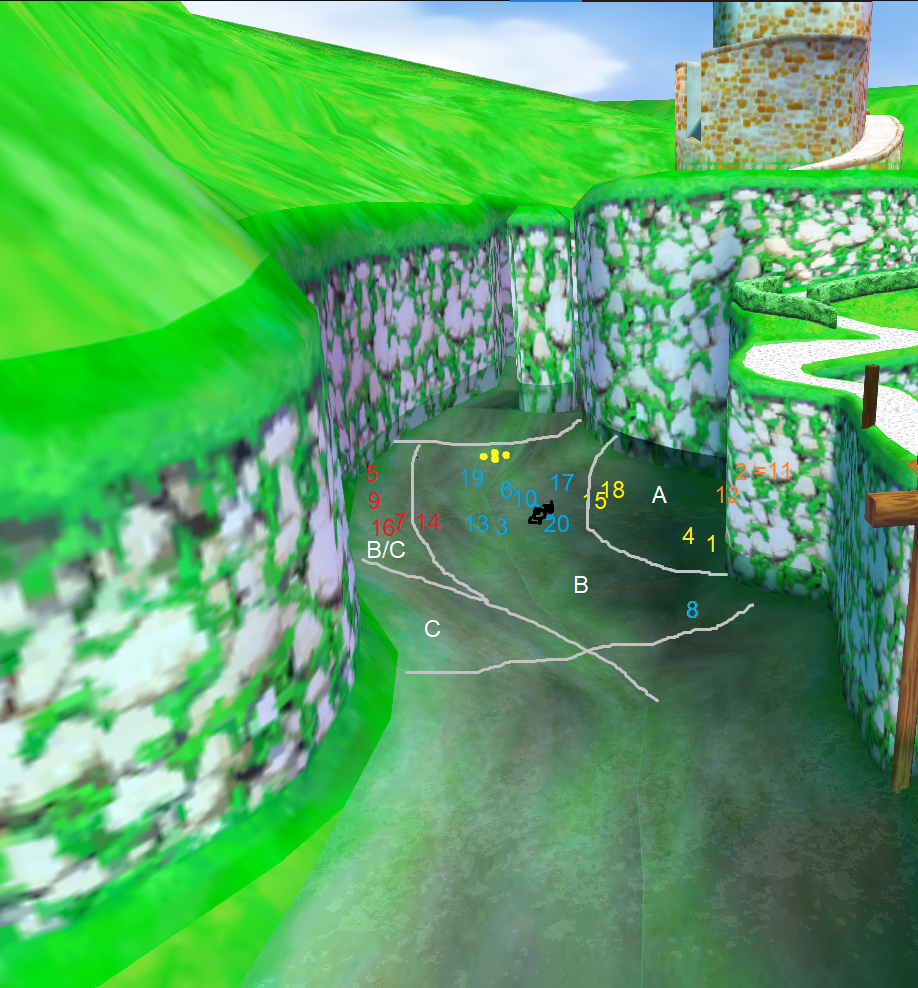
Zone A: Rushdown
Move 1: spin-jump-dive straight towards the spider. This is the fastest overall option.
As you approach, you can decide to land the rollout in the water to bait the spider, or not. This early bait strategy will make the spider charge towards you, so it gets further from the windmill, so the hover will be longer and the strat overall slower. However, it prevents the spider from going off on one while you’re approaching it in the air, making the later movement safer. If baiting, make sure the spider isn’t too close to Mario in the first place so you can maintain safe spacing.
Move 2: now, we react to the distance of the spider from Mario’s landing position.
- close/baited: if the spider was baited and it’s coming at you, or you landed right in front of it, then immobilise it with a water spam-spray (WSS). Examples: #12, #18.
- medium: usually, approach + immobilse it with a spam-spray dive (SSD) – this move covers a large area with the spam-spray. Examples: #1, #4, #11.
- far: approach it with a water jump-dive (WJD), baiting it in doing so, and immobilise with WSS upon landing. Example: #2.
Move 3 (finish): you’re close enough to the spider to jump and dive onto it.
- If you don’t need to adjust angle, then the timing of the dive after the jump determines the distance of the jump-dive (remember to hold up as soon as airborne).
- If you do, then jump and hover immediately – you may also need to hover forward some distance if you fell short.
Zone B: Containment
Move 1: jump off the shore and spam-spray hover (SSH) to immobilise the spider, then change direction mid-hover to react to where it’s moved to, then dive (or rather, usually dive – more on the exceptions in a bit).
This is best in this region because the spider is either:
- too close to the left shore for a spaced spin-jump-dive approach (or close enough that an accidental bait from the rollout would pull it behind Mario);
- so far along the shore (you did 2 jump-dive-rollouts) that it’s about to skate off in a random direction – the airborne spam-spray’s wide area covers the spider’s rng options, and the hover lets you catch it.
Move 2: a few things may have happened:
- normally: with the spider far enough from the left shore, this move places Mario heading towards the spider with enough space to finish by jumping out, possibly hovering to adjust angle, then diving. Examples: #3, #6, #13, #17, #19, #20.
- far/active spider: if the spider is too far away, or wasn’t immobilised by the spam-spray, landing baits it, and it can be finished in the manner of rushdown moves 2 and 3 (see above), whereby you WSS, SSD, or jump-dive+WSS towards it depending on your distance from it after landing, then jump and dive. Example: #8.
- bad spider improv: [advanced only] if the spider is getting too close to the left shore – zone B/C in the diagram – then it can take some fairly difficult improvisation to deal with it, in particular:
- insta-dive: instead of diving into the water for move 1, dive straight onto the spider after fully adjusting the angle of the hover from the SSH. Examples: #7, #14, #16.
- three-point turn: hover on top of the spider at loosely the right angle, then back-hover and refine angle, then dive onto it. Example: #5.
Modifications for intermediate/beginner level:
- The range of spiders you would insta-dive onto increases to beyond just those with bad positions – the region moves much further right. This increases the amount of time spent hovering, which, while losing a few seconds, still lets you catch a decent windmill cycle, and gives you much more time to react and line up the angle.
- You would do the spiders in zone B/C using the bait strat (see next section).
Zone C: Bait
In this region, we give up on the spider’s position and bait it close to the windmill; this is very slow. In zone C, it’s impossible to jump from the spider to the windmill, and in zone B/C, it’s hard to adjust the angle using the zone-B strat (previous section), so we opted for an easier option. After one jump-dive-rollout along the shore, at which point you’ve decided to bait the spider:
- Spin-jump-dive directly towards the windmill (the bait starts upon landing).
- WJD further towards the windmill.
- Jump emptily out of the water while waiting for the spider to arrive.
- Jump, hover backwards over the spider, and if you immobilise it, hover forward, adjust angle, and dive onto it. If you fail to immobilise it then you’d drop down and improvise using WSS, or jump + spam-spray, then jump-hover-dive as usual. Example: #9.
Windmill
The windmill turns one full circle in 60.06s (that’s 60×30 frames at 29.97fps), meaning its cycles repeat every 15s. We’ll look at 3 setups for windmill wallkicks, covering different cycles and difficulties.
Grab Setups
The first step before each wallkick setup is to ledge-grab the windmill’s alcove. Where exactly depends on the setup, but the methods are the same. Here are two:
Wall-Kick Hover
This is the usual setup; some tips to do it quickly:
- After landing from the hover to the windmill, buffer a spin-jump, and release it after taking a step towards the left edge of the alcove.
- Once airborne, hold up-right to drift rightwards, setting up a more obtuse angle for the wall-kick, which will let Mario turn more quickly.
- Press A to kick, then hover right after – how much later depends on how high up the wall the wall-kick hits, but optimally it’s immediate.
- After the kick, hold up-left to turn, then drop the hover into a ledgegrab in the right spot.
GWKH
Write up needed.
Wall-Kicks
The three wall-kick setups cover different arrival times into the ledgegrab. A brief summary first; times are discussed using the in-game timer from practice codes, but there’ll be an example of catching each cycle early and late, since you need to be able to tell from the windmill’s position when doing runs without cheat codes.
- Right ledgegrab: this is the easiest setup, and is fastest for its cycle. This can be done by dropping the ledgegrab in around the 29.20–34.50 window (as low as ~28.70 is possible but the wallkicks become risky). The intermediate strat is to wait for this cycle if arriving early.
- Left sideflip: this is a backup for being too slow for right ledgegrab. It can be done by getting up from the ledge, then starting a sideflip in around the 32.00–39.50 window.
- Y-turn wall-kicks [advanced]: the fastest possible alcove arrival is around 25.82 sideflip time, which is the same cycle as 40.83, just barely outside the left sideflip window. Instead of waiting for right ledgegrab, there’s an immediate setup for any arrival time; it’s slower than right ledgegrab so shouldn’t be done if you’re on-time for that strat.
We’ll take a look at each setup, with detailed inputs and cues. The first two setups are very lenient, so it’s far from necessary to perform each tip every time, but they give a solid grounding to build consistency and good habits, as a basis for muscle memory.
Right Ledgegrab
Fast (ledge-release at 29.32)
Slow (ledge-release at 33.95)
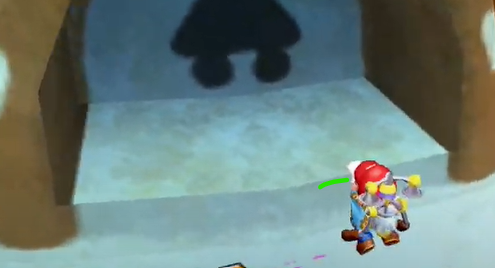
Where to grab the alcove: this white area just right of centre is a good balance of safety and speed. The further right you grab, the faster and riskier the setup becomes - particularly after Mario’s left hand exits the dark region he’s holding in this picture. Left is easier and slower, but it stops working if Mario’s left side crosses into the left half of the ledge.
When to start the wallkicks: firstly, make sure to let the camera settle after the ledge-grab if you’re looking for a visual cue. There are a couple of cues for when to start if you’re too early, and when is too late, but you’re often on time (it’s a ~5s window) and can go right away.
- Early: start as soon as Mario becomes fully occluded by the windmill. This means that the further right you are, the faster you’ll start the kicks and the faster (by about the same amount) you’ll enter the loading zone at the top.
- Late: the setup works up to when Mario peeks out past the rightmost edge of the windmill blade.
What the inputs are: press B to wallslide, then hold down, then press A for the first kick. Do 6 wall-kicks, then hover, turn towards the roof, and dive onto it.
Wall-kick specifics: what matters here is the direction of the left stick (affecting the trajectories) and the duration of the A-press (affecting height) at each kick. Maximum height is gained by holding A for 5 frames or longer, which we think of as a long press; we do short presses (≤3f but it doesn’t matter since the strats are lenient) to try to space on the windmill.
- The directions are down-left on odd kicks and up-left on even kicks, except the kick 1/6 is straight down and 6/6 is up-right.
- The A-press durations are all long except 5/6 is short.
Wall-kick intuition: the basic ideas are to stay just-to-the-right of the windmill axis, to space safely on the windmill blades, and to not get stuck under the eaves. The up/down-left inputs pull Mario towards the centre, so if you start kicks further on the left, go for more straight up/down inputs. It’s hard to hit every diagonal input cleanly, but much more important if you start kicks further on the right. On the final kick, going straight-right can be safer to avoid the eaves, and hovering for longer gains height to give more clearance over the roof. Take your time when starting out to get wallslides before kicking, and clean, high kicks.
Left Sideflip
Fast (sideflip at 32.12)
Slow (sideflip at 39.36)
Where to grab the alcove: this white area just left of center.
When to start the wallkicks: there aren’t many good visuals for when is too late, but the 2 videos above loosely show the time window (7.5s – 50% of the time – at least). It overlaps with the right ledgegrab window by about 3 seconds.
What the inputs are: there are two setups to get the sideflip. First press L after the ledge-grab to centre cam, then:
- Press A to get up, start holding down during the get-up, then time an A press to do a (buffered) sideflip. The window for the A press is 2 frames, and can be learnt by timing and visual feel.
- Press A to get up, then hold up for a bit to walk forward about a Mario foot length. Now, if in the window, hold L, then hold down, then press A, each about 4 frames apart. This is removes the 2-frame window but the turnaround animation can sometimes not come out for unknown reasons. If Mario hits his head then you likely walked too far forwards; walk too little and Mario will turnaround off the ledge. After the sideflip, do 4 wall-kicks, then hover, turn around to get over the roof, then dive.
Wall-kick specifics: check the right ledgegrab paragraph for the basic principles. Many patterns will work, since the 7.5s window allows for lots of windmill positions, but we’ll go over one set that should always work.
- The directions are up-left and down-left (i.e. outwards), except for kick 1/4, which is straight up.
- The A-press durations are all long except 1/4, which is short.
Wall-kick intuition: again, check the right ledgegrab paragraph for the basic principles.
Y-Turn Wall-Kicks
Left Side
Right Side
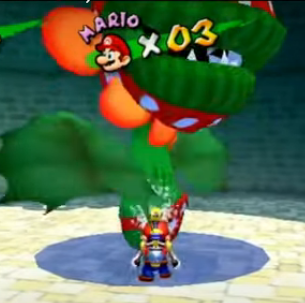
Fight
Baiting Petey to Open His Mouth
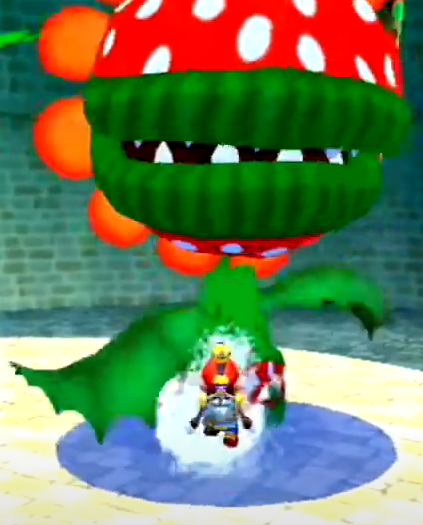
Knowing how to cause Petey to open his mouth is important for success in the fight. In order to trigger this reliably, you must stand to the side of him.
You want to stand as close to the right as possible in order to reduce the amount of time Petey takes to turn, but not too much to the right or Petey will swing his head. You want to line up Mario’s legs on both sides of the dark green line on Petey’s hand before he rises back up for the optimal positioning.
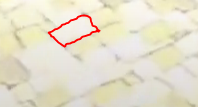
For this first hit, this is made more difficult since you need to clean the ground first, and get near the spot. There’s an alternative visual cue that you can use to line Mario up. These 4 white bricks near Petey can be useful for lining you up properly. Look for the bottom corner closest to Petey for the optimal turn.

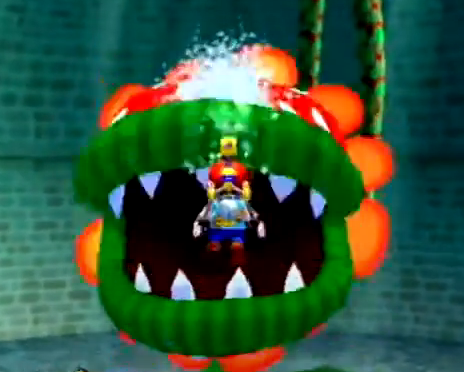
Petey Spam Sprays
There are two different methods for quickly filling Petey with water.
Y-Cam Method
Simply Y-Cam, aim at Petey’s mouth, spray, then continuously spam spray to exit Y cam and finish filling. This is a few frames slower, but can be more consistent for beginners.
Backflip Method
It takes 2 full spam sprays to fill Petey’s mouth (go for 3 to be safe in case you partially miss). If you’re having trouble, focusing on having three properly timed spam sprays can help you become more consistent with the timing, as well as making sure to focus on hitting R slightly before A.
Start your backflip when Petey is almost finished turning, so that you are near the top of his head as he opens it to maximize your window for spam sprays.
Shine Grab
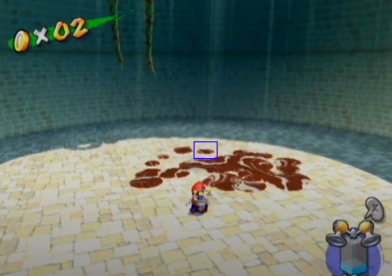
After the third ground pound, you will want to orient yourself so you’re facing towards the two vines hanging down from the ceiling. Towards the middle of the screen, you’ll notice another 4 white brick pattern in an L shape. Standing near it, on this brick, puts you in the perfect position for the shine.
If you have perfect spam sprays, Petey will always disintegrate in the same spot. Look for this goop particle to vanish before you double jump hover to touch the lowest possible spot. See this image for proper positioning.
120 Shines
For 120 Shines, all you need to do is grab the windmill ![]() before you either ride it up or wallkick up.
before you either ride it up or wallkick up.