Ricco 5
There are two parts to Ricco 5: the Entry and the Blooper Fight.
Entry
The ramp movement can be performed by either an instant momentum spin or a speed double jump.
Beginner - Ramp Spin
- From the start, hoverslide forward then instant momentum spin just before the top of the ramp
- Hoverslide across the grate, fall off, briefly hover, then spin jump and hover cancel to the white section
- Spin jump and hover onto the steam stack, then spin jump dive onto the catwalk and rollout
- Spam spray and dive through the bloopers, then fall off the end of the catwalk
- Hover to the fruit machine then dive rollout onto the springy valve
- Hover cancel to align yourself towards the blooper if necessary, then spray the blooper and begin the fight
Advanced - Speed Double
- From the start, hoverslide forward then slide off the right of the ramp and double jump while spraying
- Brifely hover then dive into the water that was sprayed on the top section of the boat
- Slide across the top of the grate, fall off, briefly hover, then spin jump and hover cancel to the white section
- Finish the entry the same as the beginner section
Blooper Fight
First Nose Pull
- Spam spray twice immediately upon bouncing on the valve and cancel the large jump with a hover.
Spray on the way down. Pay attention to the blooper so you can see if the water from the spam sprays hits him. - If it hits him, spray and walk forward, standing still briefly once the nose is in range of the spray. Once you reach the edge of the blue circle, dive into the nose and hold down on the stick right after pressing B.
- The length you have to stand still for depends on where you land on the platform (i.e. timing of the hover after valve bounce) and how early the water from the spam sprays hit him.
- You can also avoid stopping entirely by instead holding slightly up on the control stick so Mario moves forward very slowly, as shown in the reference vid.
- If the water doesn’t hit him, you have to stand still much longer. Of course, this loses a lot of time.
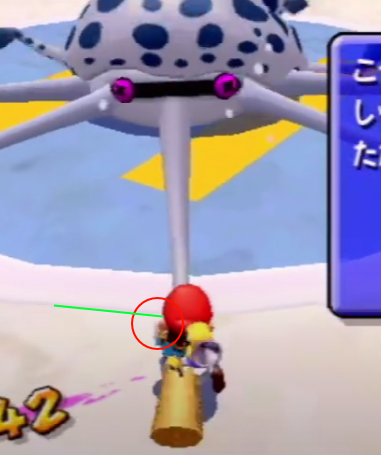
- Release the nose when the top of Mario’s left ear passes the outer circle on the ground. The specific line to look for is indicated in green on the image above, taken 1 frame before nose release. This visual cue also works for 2nd nose pull.
- This visual cue requires the camera to be zoomed all the way in to work. If it isn’t, use your index finger to push the C-stick forward while you are pulling the nose.
Second Nose Pull
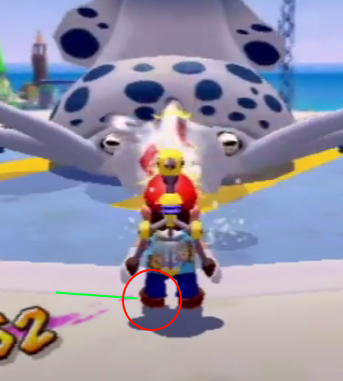
- Stand facing the blooper so that Mario’s feet are about halfway across the outer circle, indicated by the green line in the picture above.
- Right as the tentacles slam down, tap A briefly to do a small jump, then dive. Hold down on the stick immediatly after diving.
- Switch to the hover nozzle while you are pulling the nose back to prepare for the Shine Grab.
Shine Grab
- Just as the Shine’s eyes are about to become visible again during its rotation, input a hoverslide rollout, holding A for 5 frames or longer. The image above was taken 1 frame before Mario becomes actionnable again.
- For ILs, it is much easier to see the eyes of the Shine if it has not been collected already. To reset it to a non-collected state, reset the game and reenter the level from a fresh file.
Sumi Skip
( video by LotfySMS )